- Sign In
- |
- Sign Up
- |
- My Quote (0)
- |
- CART (0)

This product comes with 324CAS-0066 case.
This product comes with 324CAS-0066 case.
Measure moisture in an assortment of different building materials with this digital moisture meter capable of moisture detection in three scales. In addition, this meter features a digital display, an adjustable alarm, and an exclusive calibrated drywall scale.
Features
Three scales
Applications
| Measurement Type | Pin |
| Moisture Range Wood Scale (Min) (%) | 6 |
| Moisture Range Wood Scale (Msx)(%) | 40 |
| Moisture Range Non-Wood Scale (Min) (%) | 6 |
| Moisture Range Reference Scale (Max) | 100 |
| Temperature Compensation | 0 to 255°F (-18 to 124°C) in pin mode |
| Display Type | Digital |
| Data Logging | Yes |
| Memory Capacity | 100 readings |
| Battery | One 9V battery |
| Height | 3 |
| Width | 7 1/2 |
| Length | 1 3/4 |
by: Tom Laurenzi, Delmhorst
There is an often-unseen problem lurking in many homes across the country: moisture intrusion. A little excess water in the wrong place can cause many other problems, such as mold growth, pest infestations, and weakened building structures.
In many cases, moisture problems in houses or other structures are easy to miss until they've progressed past the point of easy repair. Early detection of these problems is a must for minimizing the extent and cost of the damage. But, how can you identify a moisture problem in the first place?
There are a few warning signs that homeowners should be on the lookout for, including:
One of the most frequently-encountered signs of a moisture problem is the presence of strong, musty odors. This olfactory warning sign is a strong indicator that there is water damage somewhere nearby - possibly in building materials hidden from your direct view, such as in the insulation behind your walls or in a crawl space that you may have difficulty reaching unaided.
This odor is often caused by bacteria and mold growth that feeds on the excess moisture in a dark, cool space. If left alone long enough, the spores from mold can become a respiratory hazard, and the affected area may start showing visible signs of rot.
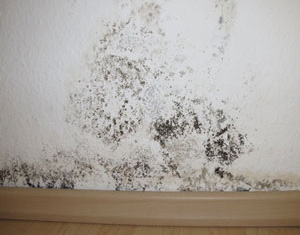
One of the most obvious signs of water-related problems in any structure is the appearance of dark patches in walls, ceilings, and other surfaces. As water seeps into building materials, it tends to cause the materials to visibly darken.
Homeowners can often find these dark patches in ceilings after a heavy storm - which indicates roof damage - or in walls if there's a burst or leaky pipe there.
Water is a basic necessity for life - and pests like ants, cockroaches, rodents, termites, and wasps are no exception. A sudden increase in the presence of pests could be an indirect indication that they've found a suitable source of water in your home. Of course, other nutrient sources, such as open food containers, exposed trash bins, and the like can also attract pests, so it's important to consider whether there are any such food sources nearby.
So, say you've spotted one of the warning signs above, but want to make sure whether or not there's a moisture problem in your house. How can you get a quantifiable, scientifically-accurate measurement of how much moisture is in your walls, ceilings, floors, etc.?
One of the best ways to get quantifiable measurements of moisture in the home is to use a moisture meter!
Moisture meters are specialized devices that are designed to use either electrical resistance (pin-type) or electromagnetic radio frequencies (pinless type) to measure the amount of moisture in some kind of material - such as wood.
One question that a lot of do-it-yourself enthusiasts who aren't as familiar with the need to monitor moisture in wood and other building materials tend to ask is: "what does moisture content in wood mean?"
Moisture content, or %MC, is the measurement of how much water is present in the wood compared to the dry matter of the wood. Technically speaking, it is possible to have a moisture content measurement over 100% - which would happen if you had more water than wood in the sample being tested. However, this is not common.
Wood is a hygroscopic material, meaning that it tends to absorb and release moisture until it reaches equilibrium with its surrounding environment. As such, in normal conditions, the moisture content of wood is largely determined by its environment - warm, dry environments tend to make wood drier, and cool, wet environments tend to make wood wetter.
When dealing with wood for flooring and other applications, the moisture content of that wood can have an enormous impact on the quality of the wood.
For example, in wood flooring, if the wood is too dry during installation, it may end up absorbing moisture from the air at the installation site. This can cause the wood to start swelling so planks push up against one another after installation. Or, the wood may split and crack.
On the other hand, an excess of moisture in wood can cause other problems, including, but not limited to:
The further the wood is from having an appropriate moisture content for the environment it will be used in, the more pronounced these problems will be.
This is why anyone working with flooring and wood products needs to use a moisture meter to measure the %MC of wood. With a moisture meter for wood, it is possible to get an accurate, quantitative measurement of wood's moisture content - which is invaluable for determining if the wood is at risk of developing problems later on.

Using a moisture meter to check the %MC of wood is relatively simple whether you're using a pin-type or pinless-type meter.
With a pin meter, you simply insert the pins into the wood as deeply as you like, and push a button to get a measurement of the wood's moisture content. With a pinless meter, you can just press the scanning plate against the wood so it's flush with the wood's surface. Then, push the button to get a reading.
One thing to keep in mind is that a wood moisture meter is typically calibrated to get accurate readings in one species of wood. Other species of wood have different physical properties that may throw off moisture measurements. For this reason, it's important to know what kind of wood you're testing, and to use a species correction chart to adjust your reading results.

For any flooring installer and inspector, testing the moisture of concrete can be a pain. Unlike wood or other building materials with a consistent set of physical properties, concrete can have countless different properties from one batch to the next, even when two mixes come from the same manufacturer!
This prevents concrete from having a consistent electrical resistance value to allow pin-type moisture meters to get accurate readings. The variable density of concrete mixes means that there is no consistent specific gravity value for pinless meters to be calibrated to, either.
Calcium chloride tests are another popular testing method. However, they only reveal the moisture conditions in the top layer of the slab. Because of this, these tests miss the moisture conditions in the deeper layers of the slab, where the majority of the moisture resides. So, while useful for determining if the slab is ready for a chemical sealant to be applied, a calcium chloride test doesn't provide the whole picture to a contractor.
So, how can contractors perform reliable concrete moisture tests, ones that generate quantifiable results that can be used to guide installation decisions?
The best way to get accurate information about the moisture conditions deep inside of a concrete slab is to follow the ASTM F-2170 standard, which was recently updated by ASTM to a 24 hour waiting period.

Testing concrete moisture under the F-2170 standard is a process that involves several different steps:
Using this process, you can gather quantitative data about the moisture conditions deep in the slab - which is useful for determining your risk of moisture-related problems later on.
To follow this process, you'll need to have a few specific tools available, including:
With all of these tools in hand, plus the obligatory safety gear for the jobsite, you should be ready to take accurate measurements in concrete on nearly any job!
by: Tom Laurenzi, Delmhorst
Odds are that, if you're a flooring contractor or inspector, you're already familiar with the ASTM-F-2170 standard for measuring moisture in concrete. This testing method for concrete has been the industry standard for years now, allowing flooring specialists to establish whether or not concrete subfloors are ready to be built on, or a coating or sealer to be applied.
However, most laymen have never even heard of the standard, let alone become familiar with the details and reasons why the tests are necessary for flooring work. Some inexperienced individuals try to use a pin moisture meter for concrete floor testing rather than following the rigorous ASTM standard.
While a pin or even pinless moisture meter can give a general idea of the presence of moisture, their results do not provide information upon which to make sound decisions.
To explain why the ASTM-F-2170 standard is so necessary in the world of concrete and flooring work, it's necessary to know what the standard is.
The ASTM-F-2170 standard is a testing method for determining the relative humidity (RH) that is present in concrete floor slabs. This testing method was developed by the American Society for Testing and Materials, aka ASTM International.
Using this testing method, contractors are better able to predict how a concrete slab will behave in its final use. This helps prevent contractors from building on concrete subfloors that aren't yet ready.
Building on concrete that isn't ready can lead to flooring problems such as buckling, warping, or other moisture-related problems as excess moisture from the concrete bleeds into the flooring installed over it.
Worse yet, these issues lead to callbacks and dissatisfied customers, which can hurt a contractor's business. By following the ASTM-F-2170 testing method, flooring contractors can avoid these problems from poorly prepared concrete.
Beyond that, contractors follow this ASTM testing standard because it is often considered the gold standard for moisture testing in concrete, and many manufacturers cite it as an accepted testing method. If a contractor doesn't follow this testing guideline, or any other manufacturer-approved testing method, the manufacturer may deem their product warranty is voided and not assume responsibility if there's a flooring failure later because of moisture issues.

Under this testing standard, contractors drill holes in a concrete floor and insert sleeves that are then sealed. After this is done, the holes are given time to acclimate so that any changes caused by drilling a hole into the concrete can be eliminated.
These in-situ probes that are left in the concrete are then attached to an RH meter (also known as a thermo-hygrometer) to take readings of the moisture conditions deep in the slab.
The readings are taken on a regular basis until the RH conditions in the concrete indicate that it's ready.
To adhere to the ASTM-F-2170 standard, several steps need to be taken:
First, the contractor needs to verify the slab's thickness and surface area, as well as the RH of the room/area where the concrete slab is located, and any potential sources of moisture that may be present.
Knowing the depth of the slab lets you know how deep to drill the testing holes, and knowing the total surface area tells you how many test sites you'll need to meet the standard's minimum requirements.
Checking the RH of the area where the concrete slab is located and identifying possible moisture intrusion sources can help you see why a slab might not be ready for the next step.
Additionally, no in-situ probe should be left in concrete for more than 30 days without a calibration check, according to the standard. This is because concrete is a mildly caustic environment, which can damage RH sensors, causing them to lose calibration and start to return unreliable readings.
Overall, the use of the concrete testing ASTM-F-2170 standard is a key part of any flooring job. Following the standard can help reduce callbacks, improve the useful life of flooring, and preserve a contractor's reputation through superior quality work.
| Measurement Type | Pin |
| Moisture Range Wood Scale (Min) (%) | 6 |
| Moisture Range Wood Scale (Msx)(%) | 40 |
| Moisture Range Non-Wood Scale (Min) (%) | 6 |
| Moisture Range Reference Scale (Max) | 100 |
| Temperature Compensation | 0 to 255°F (-18 to 124°C) in pin mode |
| Display Type | Digital |
| Data Logging | Yes |
| Memory Capacity | 100 readings |
| Battery | One 9V battery |
| Height | 3 |
| Width | 7 1/2 |
| Length | 1 3/4 |
by: Tom Laurenzi, Delmhorst
There is an often-unseen problem lurking in many homes across the country: moisture intrusion. A little excess water in the wrong place can cause many other problems, such as mold growth, pest infestations, and weakened building structures.
In many cases, moisture problems in houses or other structures are easy to miss until they've progressed past the point of easy repair. Early detection of these problems is a must for minimizing the extent and cost of the damage. But, how can you identify a moisture problem in the first place?
There are a few warning signs that homeowners should be on the lookout for, including:
One of the most frequently-encountered signs of a moisture problem is the presence of strong, musty odors. This olfactory warning sign is a strong indicator that there is water damage somewhere nearby - possibly in building materials hidden from your direct view, such as in the insulation behind your walls or in a crawl space that you may have difficulty reaching unaided.
This odor is often caused by bacteria and mold growth that feeds on the excess moisture in a dark, cool space. If left alone long enough, the spores from mold can become a respiratory hazard, and the affected area may start showing visible signs of rot.
One of the most obvious signs of water-related problems in any structure is the appearance of dark patches in walls, ceilings, and other surfaces. As water seeps into building materials, it tends to cause the materials to visibly darken.
Homeowners can often find these dark patches in ceilings after a heavy storm - which indicates roof damage - or in walls if there's a burst or leaky pipe there.
Water is a basic necessity for life - and pests like ants, cockroaches, rodents, termites, and wasps are no exception. A sudden increase in the presence of pests could be an indirect indication that they've found a suitable source of water in your home. Of course, other nutrient sources, such as open food containers, exposed trash bins, and the like can also attract pests, so it's important to consider whether there are any such food sources nearby.
So, say you've spotted one of the warning signs above, but want to make sure whether or not there's a moisture problem in your house. How can you get a quantifiable, scientifically-accurate measurement of how much moisture is in your walls, ceilings, floors, etc.?
One of the best ways to get quantifiable measurements of moisture in the home is to use a moisture meter!
Moisture meters are specialized devices that are designed to use either electrical resistance (pin-type) or electromagnetic radio frequencies (pinless type) to measure the amount of moisture in some kind of material - such as wood.
One question that a lot of do-it-yourself enthusiasts who aren't as familiar with the need to monitor moisture in wood and other building materials tend to ask is: "what does moisture content in wood mean?"
Moisture content, or %MC, is the measurement of how much water is present in the wood compared to the dry matter of the wood. Technically speaking, it is possible to have a moisture content measurement over 100% - which would happen if you had more water than wood in the sample being tested. However, this is not common.
Wood is a hygroscopic material, meaning that it tends to absorb and release moisture until it reaches equilibrium with its surrounding environment. As such, in normal conditions, the moisture content of wood is largely determined by its environment - warm, dry environments tend to make wood drier, and cool, wet environments tend to make wood wetter.
When dealing with wood for flooring and other applications, the moisture content of that wood can have an enormous impact on the quality of the wood.
For example, in wood flooring, if the wood is too dry during installation, it may end up absorbing moisture from the air at the installation site. This can cause the wood to start swelling so planks push up against one another after installation. Or, the wood may split and crack.
On the other hand, an excess of moisture in wood can cause other problems, including, but not limited to:
The further the wood is from having an appropriate moisture content for the environment it will be used in, the more pronounced these problems will be.
This is why anyone working with flooring and wood products needs to use a moisture meter to measure the %MC of wood. With a moisture meter for wood, it is possible to get an accurate, quantitative measurement of wood's moisture content - which is invaluable for determining if the wood is at risk of developing problems later on.
Using a moisture meter to check the %MC of wood is relatively simple whether you're using a pin-type or pinless-type meter.
With a pin meter, you simply insert the pins into the wood as deeply as you like, and push a button to get a measurement of the wood's moisture content. With a pinless meter, you can just press the scanning plate against the wood so it's flush with the wood's surface. Then, push the button to get a reading.
One thing to keep in mind is that a wood moisture meter is typically calibrated to get accurate readings in one species of wood. Other species of wood have different physical properties that may throw off moisture measurements. For this reason, it's important to know what kind of wood you're testing, and to use a species correction chart to adjust your reading results.
For any flooring installer and inspector, testing the moisture of concrete can be a pain. Unlike wood or other building materials with a consistent set of physical properties, concrete can have countless different properties from one batch to the next, even when two mixes come from the same manufacturer!
This prevents concrete from having a consistent electrical resistance value to allow pin-type moisture meters to get accurate readings. The variable density of concrete mixes means that there is no consistent specific gravity value for pinless meters to be calibrated to, either.
Calcium chloride tests are another popular testing method. However, they only reveal the moisture conditions in the top layer of the slab. Because of this, these tests miss the moisture conditions in the deeper layers of the slab, where the majority of the moisture resides. So, while useful for determining if the slab is ready for a chemical sealant to be applied, a calcium chloride test doesn't provide the whole picture to a contractor.
So, how can contractors perform reliable concrete moisture tests, ones that generate quantifiable results that can be used to guide installation decisions?
The best way to get accurate information about the moisture conditions deep inside of a concrete slab is to follow the ASTM F-2170 standard, which was recently updated by ASTM to a 24 hour waiting period.
Testing concrete moisture under the F-2170 standard is a process that involves several different steps:
Using this process, you can gather quantitative data about the moisture conditions deep in the slab - which is useful for determining your risk of moisture-related problems later on.
To follow this process, you'll need to have a few specific tools available, including:
With all of these tools in hand, plus the obligatory safety gear for the jobsite, you should be ready to take accurate measurements in concrete on nearly any job!
by: Tom Laurenzi, Delmhorst
Odds are that, if you're a flooring contractor or inspector, you're already familiar with the ASTM-F-2170 standard for measuring moisture in concrete. This testing method for concrete has been the industry standard for years now, allowing flooring specialists to establish whether or not concrete subfloors are ready to be built on, or a coating or sealer to be applied.
However, most laymen have never even heard of the standard, let alone become familiar with the details and reasons why the tests are necessary for flooring work. Some inexperienced individuals try to use a pin moisture meter for concrete floor testing rather than following the rigorous ASTM standard.
While a pin or even pinless moisture meter can give a general idea of the presence of moisture, their results do not provide information upon which to make sound decisions.
To explain why the ASTM-F-2170 standard is so necessary in the world of concrete and flooring work, it's necessary to know what the standard is.
The ASTM-F-2170 standard is a testing method for determining the relative humidity (RH) that is present in concrete floor slabs. This testing method was developed by the American Society for Testing and Materials, aka ASTM International.
Using this testing method, contractors are better able to predict how a concrete slab will behave in its final use. This helps prevent contractors from building on concrete subfloors that aren't yet ready.
Building on concrete that isn't ready can lead to flooring problems such as buckling, warping, or other moisture-related problems as excess moisture from the concrete bleeds into the flooring installed over it.
Worse yet, these issues lead to callbacks and dissatisfied customers, which can hurt a contractor's business. By following the ASTM-F-2170 testing method, flooring contractors can avoid these problems from poorly prepared concrete.
Beyond that, contractors follow this ASTM testing standard because it is often considered the gold standard for moisture testing in concrete, and many manufacturers cite it as an accepted testing method. If a contractor doesn't follow this testing guideline, or any other manufacturer-approved testing method, the manufacturer may deem their product warranty is voided and not assume responsibility if there's a flooring failure later because of moisture issues.
Under this testing standard, contractors drill holes in a concrete floor and insert sleeves that are then sealed. After this is done, the holes are given time to acclimate so that any changes caused by drilling a hole into the concrete can be eliminated.
These in-situ probes that are left in the concrete are then attached to an RH meter (also known as a thermo-hygrometer) to take readings of the moisture conditions deep in the slab.
The readings are taken on a regular basis until the RH conditions in the concrete indicate that it's ready.
To adhere to the ASTM-F-2170 standard, several steps need to be taken:
First, the contractor needs to verify the slab's thickness and surface area, as well as the RH of the room/area where the concrete slab is located, and any potential sources of moisture that may be present.
Knowing the depth of the slab lets you know how deep to drill the testing holes, and knowing the total surface area tells you how many test sites you'll need to meet the standard's minimum requirements.
Checking the RH of the area where the concrete slab is located and identifying possible moisture intrusion sources can help you see why a slab might not be ready for the next step.
Additionally, no in-situ probe should be left in concrete for more than 30 days without a calibration check, according to the standard. This is because concrete is a mildly caustic environment, which can damage RH sensors, causing them to lose calibration and start to return unreliable readings.
Overall, the use of the concrete testing ASTM-F-2170 standard is a key part of any flooring job. Following the standard can help reduce callbacks, improve the useful life of flooring, and preserve a contractor's reputation through superior quality work.


